Easy Mail Stamp Layering 2 Ways
[fusion_builder_container hundred_percent=”no” equal_height_columns=”no” hide_on_mobile=”small-visibility,medium-visibility,large-visibility” background_position=”center center” background_repeat=”no-repeat” fade=”no” background_parallax=”none” parallax_speed=”0.3″ video_aspect_ratio=”16:9″ video_loop=”yes” video_mute=”yes” border_style=”solid” admin_toggled=”no” admin_label=”Post Content”][fusion_builder_row][fusion_builder_column type=”1_1″ layout=”1_1″ background_position=”left top” background_color=”” border_size=”” border_color=”” border_style=”solid” border_position=”all” spacing=”yes” background_image=”” background_repeat=”no-repeat” padding=”” margin_top=”0px” margin_bottom=”0px” class=”” id=”” animation_type=”” animation_speed=”0.3″ animation_direction=”left” hide_on_mobile=”small-visibility,medium-visibility,large-visibility” center_content=”no” last=”no” min_height=”” hover_type=”none” link=””][fusion_imageframe image_id=”12159″ style_type=”none” stylecolor=”” hover_type=”none” bordersize=”” bordercolor=”” borderradius=”” align=”center” lightbox=”yes” gallery_id=”” lightbox_image=”https://ninamariedesign.com/wp-content/uploads/2017/05/Easy-Mail-Stamp-Layering_2.jpg” alt=”Easy Mail Stamp Layering | Nina-Marie Design” link=”” linktarget=”_self” hide_on_mobile=”small-visibility,medium-visibility,large-visibility” class=”” id=”” animation_type=”” animation_direction=”left” animation_speed=”0.3″ animation_offset=””]https://ninamariedesign.com/wp-content/uploads/2017/05/Easy-Mail-Stamp-Layering_2.jpg[/fusion_imageframe][fusion_separator style_type=”none” hide_on_mobile=”small-visibility,medium-visibility,large-visibility” top_margin=”10″ bottom_margin=”10″ alignment=”center” /][fusion_text]
Hello crafters! Today I’ve got two cards to share with you that both feature stamp layering. They are simple and fun to make, plus are easy to mail; what could be better than that?
I’m sharing these cards today as a guest post for Sunny Studio Stamps. Mendi – the creator and owner of Sunny Studio – is a good friend of mine and I always love supporting her company as often as I can by making cards with her fun products. Here’s a look at the two cards I made… each use the same general technique but both look completely different!
[/fusion_text][fusion_separator style_type=”none” hide_on_mobile=”small-visibility,medium-visibility,large-visibility” top_margin=”10″ bottom_margin=”10″ alignment=”center” /][/fusion_builder_column][fusion_builder_column type=”1_2″ layout=”1_2″ spacing=”” center_content=”no” hover_type=”none” link=”” min_height=”” hide_on_mobile=”small-visibility,medium-visibility,large-visibility” class=”” id=”” background_color=”” background_image=”” background_position=”left top” background_repeat=”no-repeat” border_size=”0″ border_color=”” border_style=”solid” border_position=”all” padding=”” dimension_margin=”” animation_type=”” animation_direction=”left” animation_speed=”0.3″ animation_offset=”” last=”no”][fusion_imageframe image_id=”12155″ style_type=”none” stylecolor=”” hover_type=”none” bordersize=”” bordercolor=”” borderradius=”” align=”center” lightbox=”yes” gallery_id=”” lightbox_image=”https://ninamariedesign.com/wp-content/uploads/2017/05/Easy-Mail-Stamp-Layering_3.jpg” alt=”Easy Mail Stamp Layering | Nina-Marie Design” link=”” linktarget=”_self” hide_on_mobile=”small-visibility,medium-visibility,large-visibility” class=”” id=”” animation_type=”” animation_direction=”left” animation_speed=”0.3″ animation_offset=””]https://ninamariedesign.com/wp-content/uploads/2017/05/Easy-Mail-Stamp-Layering_3.jpg[/fusion_imageframe][/fusion_builder_column][fusion_builder_column type=”1_2″ layout=”1_2″ spacing=”” center_content=”no” hover_type=”none” link=”” min_height=”” hide_on_mobile=”small-visibility,medium-visibility,large-visibility” class=”” id=”” background_color=”” background_image=”” background_position=”left top” background_repeat=”no-repeat” border_size=”0″ border_color=”” border_style=”solid” border_position=”all” padding=”” dimension_margin=”” animation_type=”” animation_direction=”left” animation_speed=”0.3″ animation_offset=”” last=”no”][fusion_imageframe image_id=”12157″ style_type=”none” stylecolor=”” hover_type=”none” bordersize=”” bordercolor=”” borderradius=”” align=”center” lightbox=”yes” gallery_id=”” lightbox_image=”https://ninamariedesign.com/wp-content/uploads/2017/05/Easy-Mail-Stamp-Layering_13.jpg” alt=”Easy Mail Stamp Layering | Nina-Marie Design” link=”” linktarget=”_self” hide_on_mobile=”small-visibility,medium-visibility,large-visibility” class=”” id=”” animation_type=”” animation_direction=”left” animation_speed=”0.3″ animation_offset=””]https://ninamariedesign.com/wp-content/uploads/2017/05/Easy-Mail-Stamp-Layering_13.jpg[/fusion_imageframe][/fusion_builder_column][fusion_builder_column type=”1_1″ layout=”1_1″ background_position=”left top” background_color=”” border_size=”” border_color=”” border_style=”solid” border_position=”all” spacing=”yes” background_image=”” background_repeat=”no-repeat” padding=”” margin_top=”0px” margin_bottom=”0px” class=”” id=”” animation_type=”” animation_speed=”0.3″ animation_direction=”left” hide_on_mobile=”small-visibility,medium-visibility,large-visibility” center_content=”no” last=”no” min_height=”” hover_type=”none” link=””][fusion_separator style_type=”none” hide_on_mobile=”small-visibility,medium-visibility,large-visibility” top_margin=”10″ bottom_margin=”10″ alignment=”center” /][fusion_text]
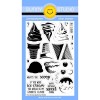
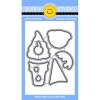
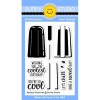
For these cards, I am using some of her newest stamps; Perfect Popsicles and Two Scoops. There are also coordinating dies available for both sets (see the Perfect Popsicle and Two Scoops dies).
On the first card with the adorable mint chocolate chip ice cream cone I was being very conscious of the fact that I was going to be making this particular card for my dad. When I create a “guy card”, I like to make them clean-lined and no frills. Guy cards can be a struggle for many of us I know, so I find it helpful to keep them clean and simple.
[/fusion_text][fusion_separator style_type=”none” hide_on_mobile=”small-visibility,medium-visibility,large-visibility” top_margin=”10″ bottom_margin=”10″ alignment=”center” /][fusion_imageframe image_id=”12191″ style_type=”none” stylecolor=”” hover_type=”none” bordersize=”” bordercolor=”” borderradius=”” align=”center” lightbox=”yes” gallery_id=”” lightbox_image=”https://ninamariedesign.com/wp-content/uploads/2017/05/Easy-Mail-Stamp-Layering_12.jpg” alt=”Easy Mail Stamp Layering | Nina-Marie Design” link=”” linktarget=”_self” hide_on_mobile=”small-visibility,medium-visibility,large-visibility” class=”” id=”” animation_type=”” animation_direction=”left” animation_speed=”0.3″ animation_offset=””]https://ninamariedesign.com/wp-content/uploads/2017/05/Easy-Mail-Stamp-Layering_12.jpg[/fusion_imageframe][fusion_separator style_type=”none” hide_on_mobile=”small-visibility,medium-visibility,large-visibility” top_margin=”10″ bottom_margin=”10″ alignment=”center” /][fusion_text]
I chose to make a mint chocolate chip ice cream cone because it is my favorite ice cream flavor (plus I think its more interesting). I used inks from both Simon Says Stamp and Altenew for my stamping. You can find the colors listed below:
[/fusion_text][fusion_separator style_type=”none” hide_on_mobile=”small-visibility,medium-visibility,large-visibility” top_margin=”10″ bottom_margin=”10″ alignment=”center” /][fusion_checklist icon=”fa-heart” iconcolor=”” circle=”” circlecolor=”#00bcd4″ size=”13px” hide_on_mobile=”small-visibility,medium-visibility,large-visibility” class=”” id=””][fusion_li_item icon=””]
Ice cream scoops: Mint and Mint Candy
[/fusion_li_item][fusion_li_item icon=””]
Chocolate chip sprinkles: Dark Chocolate
[/fusion_li_item][fusion_li_item icon=””]
Cone: Paper Bag and Caramel Toffee
[/fusion_li_item][fusion_li_item icon=””]
Cherries: Teeny Bikini, Hot Lips, Lipstick Red, Dark Chocolate
[/fusion_li_item][/fusion_checklist][fusion_imageframe image_id=”12156″ style_type=”none” stylecolor=”” hover_type=”none” bordersize=”” bordercolor=”” borderradius=”” align=”center” lightbox=”yes” gallery_id=”” lightbox_image=”https://ninamariedesign.com/wp-content/uploads/2017/05/Easy-Mail-Stamp-Layering_11.jpg” alt=”Easy Mail Stamp Layering | Nina-Marie Design” link=”” linktarget=”_self” hide_on_mobile=”small-visibility,medium-visibility,large-visibility” class=”” id=”” animation_type=”” animation_direction=”left” animation_speed=”0.3″ animation_offset=””]https://ninamariedesign.com/wp-content/uploads/2017/05/Easy-Mail-Stamp-Layering_11.jpg[/fusion_imageframe][fusion_separator style_type=”none” hide_on_mobile=”small-visibility,medium-visibility,large-visibility” top_margin=”10″ bottom_margin=”10″ alignment=”center” /][fusion_text]
Next I made a background behind the ice cream cone; I used a couple of the stamp layering images and stamped a tone-on-tone pattern. For those of you new to the term, tone-on-tone stamping is where you stamp a pattern onto paper using an ink shade that is very close or slightly darker than the paper you are stamping onto.
To create the tone-on-tone effect on this card, I paired Lipstick Red ink and cardstock from Simon Says Stamp together.
[/fusion_text][fusion_separator style_type=”none” hide_on_mobile=”small-visibility,medium-visibility,large-visibility” top_margin=”10″ bottom_margin=”10″ alignment=”center” /][fusion_imageframe image_id=”12193″ style_type=”none” stylecolor=”” hover_type=”none” bordersize=”” bordercolor=”” borderradius=”” align=”center” lightbox=”yes” gallery_id=”” lightbox_image=”https://ninamariedesign.com/wp-content/uploads/2017/05/Easy-Mail-Stamp-Layering_10.jpg” alt=”Easy Mail Stamp Layering | Nina-Marie Design” link=”” linktarget=”_self” hide_on_mobile=”small-visibility,medium-visibility,large-visibility” class=”” id=”” animation_type=”” animation_direction=”left” animation_speed=”0.3″ animation_offset=””]https://ninamariedesign.com/wp-content/uploads/2017/05/Easy-Mail-Stamp-Layering_10.jpg[/fusion_imageframe][fusion_separator style_type=”none” hide_on_mobile=”small-visibility,medium-visibility,large-visibility” top_margin=”10″ bottom_margin=”10″ alignment=”center” /][fusion_text]
For the greeting, I heat embossed a sentiment from the Perfect Popsicles set in white embossing powder.
My next card came as an idea that I had while creating the card above! This one is completely one layer and features the Perfect Popsicles set.
[/fusion_text][fusion_separator style_type=”none” hide_on_mobile=”small-visibility,medium-visibility,large-visibility” top_margin=”10″ bottom_margin=”10″ alignment=”center” /][fusion_imageframe image_id=”12194″ style_type=”none” stylecolor=”” hover_type=”none” bordersize=”” bordercolor=”” borderradius=”” align=”center” lightbox=”yes” gallery_id=”” lightbox_image=”https://ninamariedesign.com/wp-content/uploads/2017/05/Easy-Mail-Stamp-Layering_5.jpg” alt=”Easy Mail Stamp Layering | Nina-Marie Design” link=”” linktarget=”_self” hide_on_mobile=”small-visibility,medium-visibility,large-visibility” class=”” id=”” animation_type=”” animation_direction=”left” animation_speed=”0.3″ animation_offset=””]https://ninamariedesign.com/wp-content/uploads/2017/05/Easy-Mail-Stamp-Layering_5.jpg[/fusion_imageframe][fusion_separator style_type=”none” hide_on_mobile=”small-visibility,medium-visibility,large-visibility” top_margin=”10″ bottom_margin=”10″ alignment=”center” /][fusion_text]
These popsicles are so cute, don’t you think? I stamped this card out in a summery color combo; you can find the ink colors I used below:
[/fusion_text][fusion_separator style_type=”none” hide_on_mobile=”small-visibility,medium-visibility,large-visibility” top_margin=”10″ bottom_margin=”10″ alignment=”center” /][fusion_checklist icon=”fa-heart” iconcolor=”” circle=”” circlecolor=”#00bcd4″ size=”13px” hide_on_mobile=”small-visibility,medium-visibility,large-visibility” class=”” id=””][fusion_li_item icon=””]
Pink: Teeny Bikini and Hot Lips
[/fusion_li_item][fusion_li_item icon=””]
Orange: Sunshine and Orange Slush
[/fusion_li_item][fusion_li_item icon=””]
Yellow: Lemon Chiffon and Lemon Zing
[/fusion_li_item][fusion_li_item icon=””]
Mint green: Mint and Mint Candy
[/fusion_li_item][fusion_li_item icon=””]
Blue: Maliblue and Caribbean Blue
[/fusion_li_item][fusion_li_item icon=””]
Brown sticks: Paper Bag, Caramel Toffee and Dark Chocolate
[/fusion_li_item][/fusion_checklist][fusion_imageframe image_id=”12195″ style_type=”none” stylecolor=”” hover_type=”none” bordersize=”” bordercolor=”” borderradius=”” align=”center” lightbox=”yes” gallery_id=”” lightbox_image=”https://ninamariedesign.com/wp-content/uploads/2017/05/Easy-Mail-Stamp-Layering_6.jpg” alt=”Easy Mail Stamp Layering | Nina-Marie Design” link=”” linktarget=”_self” hide_on_mobile=”small-visibility,medium-visibility,large-visibility” class=”” id=”” animation_type=”” animation_direction=”left” animation_speed=”0.3″ animation_offset=””]https://ninamariedesign.com/wp-content/uploads/2017/05/Easy-Mail-Stamp-Layering_6.jpg[/fusion_imageframe][fusion_separator style_type=”none” hide_on_mobile=”small-visibility,medium-visibility,large-visibility” top_margin=”10″ bottom_margin=”10″ alignment=”center” /][fusion_text]
After stamping the popsicles, I also added some of the cute melting drops around the popsicles. This brought out the colors of the popsicles really nicely and I like the additional pop of color!
[/fusion_text][fusion_separator style_type=”none” hide_on_mobile=”small-visibility,medium-visibility,large-visibility” top_margin=”10″ bottom_margin=”10″ alignment=”center” /][fusion_imageframe image_id=”12196″ style_type=”none” stylecolor=”” hover_type=”none” bordersize=”” bordercolor=”” borderradius=”” align=”center” lightbox=”yes” gallery_id=”” lightbox_image=”https://ninamariedesign.com/wp-content/uploads/2017/05/Easy-Mail-Stamp-Layering_8.jpg” alt=”Easy Mail Stamp Layering | Nina-Marie Design” link=”” linktarget=”_self” hide_on_mobile=”small-visibility,medium-visibility,large-visibility” class=”” id=”” animation_type=”” animation_direction=”left” animation_speed=”0.3″ animation_offset=””]https://ninamariedesign.com/wp-content/uploads/2017/05/Easy-Mail-Stamp-Layering_8.jpg[/fusion_imageframe][fusion_separator style_type=”none” hide_on_mobile=”small-visibility,medium-visibility,large-visibility” top_margin=”10″ bottom_margin=”10″ alignment=”center” /][fusion_text]
Next it was time for some dimension, even though this is a one layer card. Because it is also clean and simple, details are important. I used Nuvo white gloss and white blizzard drops from Tonic Studios on the popsicles and melting drops to add that little bit of depth.
You’ll also notice the brown heat embossed sentiment; this was from the Two Scoops set and I stamped it with Dark Chocolate ink. I also added a bit of clear embossing powder on top to create some contrast.
[/fusion_text][fusion_separator style_type=”none” hide_on_mobile=”small-visibility,medium-visibility,large-visibility” top_margin=”10″ bottom_margin=”10″ alignment=”center” /][fusion_imageframe image_id=”12200″ style_type=”none” stylecolor=”” hover_type=”none” bordersize=”” bordercolor=”” borderradius=”” align=”center” lightbox=”yes” gallery_id=”” lightbox_image=”https://ninamariedesign.com/wp-content/uploads/2017/05/Easy-Mail-Stamp-Layering_1.jpg” alt=”Easy Mail Stamp Layering | Nina-Marie Design” link=”” linktarget=”_self” hide_on_mobile=”small-visibility,medium-visibility,large-visibility” class=”” id=”” animation_type=”” animation_direction=”left” animation_speed=”0.3″ animation_offset=””]https://ninamariedesign.com/wp-content/uploads/2017/05/Easy-Mail-Stamp-Layering_1.jpg[/fusion_imageframe][fusion_separator style_type=”none” hide_on_mobile=”small-visibility,medium-visibility,large-visibility” top_margin=”10″ bottom_margin=”10″ alignment=”center” /][fusion_text]
I hope you will check out the two videos below to see how I created both cards. Stamp layering is so much fun, and a perfect way to add color (with detail!) to your cards without having to break out any markers, paints or pencils!
Thanks for visiting me today and a big thank you to Mendi for letting me guest with Sunny Studios today! Be sure to stop back here on Monday for a brand new tutorial. If you like stamp layering, you’ll love the upcoming video!
[/fusion_text][/fusion_builder_column][/fusion_builder_row][/fusion_builder_container][fusion_builder_container hundred_percent=”no” equal_height_columns=”no” hide_on_mobile=”small-visibility,medium-visibility,large-visibility” background_position=”center center” background_repeat=”no-repeat” fade=”no” background_parallax=”none” enable_mobile=”no” parallax_speed=”0.3″ video_aspect_ratio=”16:9″ video_loop=”yes” video_mute=”yes” border_style=”solid” padding_top=”20px” padding_bottom=”20px” admin_label=”Video”][fusion_builder_row][fusion_builder_column type=”1_1″ layout=”1_1″ spacing=”” center_content=”no” hover_type=”none” link=”” min_height=”” hide_on_mobile=”small-visibility,medium-visibility,large-visibility” class=”” id=”” background_color=”” background_image=”” background_position=”left top” background_repeat=”no-repeat” border_size=”0″ border_color=”” border_style=”solid” border_position=”all” padding=”” dimension_margin=”” animation_type=”” animation_direction=”left” animation_speed=”0.3″ animation_offset=”” last=”no”][fusion_title margin_top=”” margin_bottom=”” hide_on_mobile=”small-visibility,medium-visibility,large-visibility” class=”” id=”” size=”1″ content_align=”left” style_type=”default” sep_color=””]
WATCH THE VIDEOS
[/fusion_title][fusion_separator style_type=”none” hide_on_mobile=”small-visibility,medium-visibility,large-visibility” top_margin=”10″ bottom_margin=”10″ alignment=”center” /][fusion_youtube id=”https://youtu.be/eJKmo6C9xqM” width=”800″ height=”450″ autoplay=”false” api_params=”” hide_on_mobile=”small-visibility,medium-visibility,large-visibility” class=”” /][fusion_separator style_type=”none” hide_on_mobile=”small-visibility,medium-visibility,large-visibility” top_margin=”10″ bottom_margin=”10″ alignment=”center” /][fusion_youtube id=”https://youtu.be/C0Sy20tlspo” width=”800″ height=”450″ autoplay=”false” api_params=”” hide_on_mobile=”small-visibility,medium-visibility,large-visibility” class=”” /][/fusion_builder_column][fusion_builder_column type=”1_1″ layout=”1_1″ spacing=”” center_content=”no” hover_type=”none” link=”” min_height=”” hide_on_mobile=”small-visibility,medium-visibility,large-visibility” class=”” id=”” background_color=”#ffffff” background_image=”” background_position=”left top” undefined=”” background_repeat=”no-repeat” border_size=”7″ border_color=”#f7c025″ border_style=”solid” border_position=”left” padding=”10px 20 20 20″ margin_top=”” margin_bottom=”” animation_type=”” animation_direction=”left” animation_speed=”0.3″ animation_offset=”” last=”no”][fusion_text]
WANT TO SEE ALL OF MY VIDEOS?
Subscribe to my YouTube channel so that you’ll never miss one of my weekly tutorials! And if you enjoyed today’s video, please give it a “thumbs up”!
[/fusion_text][fusion_button link=”http://www.youtube.com/channel/UC0op_DVZPkLDnypq69UHz5Q?sub_confirmation=1″ title=”” target=”_blank” alignment=”left” modal=”” hide_on_mobile=”small-visibility,medium-visibility,large-visibility” class=”” id=”” color=”custom” button_gradient_top_color=”#ce2580″ button_gradient_bottom_color=”#ce2580″ button_gradient_top_color_hover=”#f7c025″ button_gradient_bottom_color_hover=”#f7c025″ accent_color=”” accent_hover_color=”” type=”” bevel_color=”” border_width=”” size=”xlarge” stretch=”default” shape=”” icon=”fa-heart” icon_position=”left” icon_divider=”no” animation_type=”” animation_direction=”left” animation_speed=”0.3″ animation_offset=””]SUBSCRIBE[/fusion_button][/fusion_builder_column][/fusion_builder_row][/fusion_builder_container][fusion_builder_container hundred_percent=”no” equal_height_columns=”no” hide_on_mobile=”small-visibility,medium-visibility,large-visibility” background_position=”center center” background_repeat=”no-repeat” fade=”no” background_parallax=”none” enable_mobile=”no” parallax_speed=”0.3″ video_aspect_ratio=”16:9″ video_loop=”yes” video_mute=”yes” border_style=”solid” padding_top=”20px” padding_bottom=”20px” admin_label=”Products” admin_toggled=”no”][fusion_builder_row][fusion_builder_column type=”1_1″ layout=”1_1″ spacing=”” center_content=”no” hover_type=”none” link=”” min_height=”” hide_on_mobile=”small-visibility,medium-visibility,large-visibility” class=”” id=”” background_color=”” background_image=”” background_position=”left top” background_repeat=”no-repeat” border_size=”0″ border_color=”” border_style=”solid” border_position=”all” padding=”” animation_type=”” animation_direction=”left” animation_speed=”0.3″ animation_offset=”” last=”no”][fusion_title margin_top=”” margin_bottom=”” hide_on_mobile=”small-visibility,medium-visibility,large-visibility” class=”” id=”” size=”1″ content_align=”left” style_type=”default” sep_color=””]
CARD #1: FEATURING TWO SCOOPS
[/fusion_title][fusion_separator style_type=”none” hide_on_mobile=”small-visibility,medium-visibility,large-visibility” top_margin=”10″ bottom_margin=”10″ alignment=”center” /][fusion_text]


[/fusion_text][fusion_separator style_type=”none” hide_on_mobile=”small-visibility,medium-visibility,large-visibility” top_margin=”10″ bottom_margin=”10″ alignment=”center” /][fusion_title margin_top=”” margin_bottom=”” hide_on_mobile=”small-visibility,medium-visibility,large-visibility” class=”” id=”” size=”1″ content_align=”left” style_type=”default” sep_color=””]
CARD #1: FEATURING PERFECT POPSICLES
[/fusion_title][fusion_separator style_type=”none” hide_on_mobile=”small-visibility,medium-visibility,large-visibility” top_margin=”10″ bottom_margin=”10″ alignment=”center” /][fusion_text]


[/fusion_text][/fusion_builder_column][/fusion_builder_row][/fusion_builder_container][fusion_builder_container hundred_percent=”no” equal_height_columns=”no” hide_on_mobile=”small-visibility,medium-visibility,large-visibility” background_position=”center center” background_repeat=”no-repeat” fade=”no” background_parallax=”none” enable_mobile=”no” parallax_speed=”0.3″ video_aspect_ratio=”16:9″ video_loop=”yes” video_mute=”yes” border_style=”solid” padding_top=”20px” padding_bottom=”20px” admin_label=”Share” admin_toggled=”no”][fusion_builder_row][fusion_builder_column type=”1_1″ layout=”1_1″ spacing=”” center_content=”no” hover_type=”none” link=”” min_height=”” hide_on_mobile=”small-visibility,medium-visibility,large-visibility” class=”” id=”” background_color=”” background_image=”” background_position=”left top” background_repeat=”no-repeat” border_size=”0″ border_color=”” border_style=”solid” border_position=”all” padding=”” animation_type=”” animation_direction=”left” animation_speed=”0.3″ animation_offset=”” last=”no”][fusion_title hide_on_mobile=”small-visibility,medium-visibility,large-visibility” size=”1″ content_align=”left” style_type=”default”]
SHARE THIS POST ON SOCIAL MEDIA
[/fusion_title][fusion_separator style_type=”none” hide_on_mobile=”small-visibility,medium-visibility,large-visibility” top_margin=”10″ bottom_margin=”10″ alignment=”center” /][/fusion_builder_column][fusion_builder_column type=”1_2″ layout=”1_2″ spacing=”” center_content=”no” hover_type=”none” link=”” min_height=”” hide_on_mobile=”small-visibility,medium-visibility,large-visibility” class=”” id=”” background_color=”” background_image=”” background_position=”left top” undefined=”” background_repeat=”no-repeat” border_size=”0″ border_color=”” border_style=”solid” border_position=”all” padding=”” margin_top=”” margin_bottom=”” animation_type=”” animation_direction=”left” animation_speed=”0.3″ animation_offset=”” last=”no”][fusion_imageframe image_id=”12460″ style_type=”none” stylecolor=”” hover_type=”none” bordersize=”” bordercolor=”” borderradius=”” align=”none” lightbox=”no” gallery_id=”” lightbox_image=”” alt=”” link=”” linktarget=”_self” hide_on_mobile=”small-visibility,medium-visibility,large-visibility” class=”” id=”” animation_type=”” animation_direction=”left” animation_speed=”0.3″ animation_offset=””]https://ninamariedesign.com/wp-content/uploads/2017/05/Easy-Mail-Stamp-Layering_part-two_social-01.jpg[/fusion_imageframe][/fusion_builder_column][fusion_builder_column type=”1_2″ layout=”1_2″ spacing=”” center_content=”no” hover_type=”none” link=”” min_height=”” hide_on_mobile=”small-visibility,medium-visibility,large-visibility” class=”” id=”” background_color=”” background_image=”” background_position=”left top” undefined=”” background_repeat=”no-repeat” border_size=”0″ border_color=”” border_style=”solid” border_position=”all” padding=”” margin_top=”” margin_bottom=”” animation_type=”” animation_direction=”left” animation_speed=”0.3″ animation_offset=”” last=”no” element_content=””][fusion_imageframe image_id=”12459″ style_type=”none” stylecolor=”” hover_type=”none” bordersize=”” bordercolor=”” borderradius=”” align=”none” lightbox=”no” gallery_id=”” lightbox_image=”” alt=”” link=”” linktarget=”_self” hide_on_mobile=”small-visibility,medium-visibility,large-visibility” class=”” id=”” animation_type=”” animation_direction=”left” animation_speed=”0.3″ animation_offset=””]https://ninamariedesign.com/wp-content/uploads/2017/05/Easy-Mail-Stamp-Layering_part-one_social-01.jpg[/fusion_imageframe][/fusion_builder_column][/fusion_builder_row][/fusion_builder_container]

 LinkDeli Free 15 day trial
I love these cards and stamps sets! Thanks for sharing your creativity with your videos and your amazing cards!!
These are super cute! I love the tone on tone and now I so want to try it. I noticed you used the gel pen on the cherries after applying the GA. Could you have added it before? I’ve never tried using a gel pen on top of GA. Guess I’ll have to give that a try too. This was super inspirational! Thanks so much for sharing.
Hi Birgit! You can definitely put the gel pen on first before applying the glossy accents, but I find that the gel pen shows up better when applying it afterwards. And it stays on the glossy accents beautifully after you let it dry for a couple minutes!
Thank you so much for being a guest! These are FABULOUS!