Workshop Wednesday: Inside and Out!
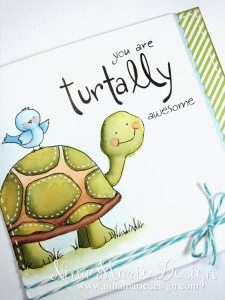
As promised, I have another boy-themed card to share with you! Today’s Workshop Wednesday is all about focusing on dressing up the inside of your card as much as the outside.
When creating a card, it’s very easy to forget that the inside – where your love-felt words and well-wishes are written- is just as important as the front of your beautifully created card, and should get some well deserved love too!
For the card I have today, I wanted to do something a little different… I decided to cut the card so that the front was not quite as wide as the back of the card. I simply took a 4 1/4″ x 11″ piece of cardstock and scored it at the 5 1/4″ mark; this allowed for the front to be a fourth of an inch smaller than the backside.

For the colors, I chose:
- Turtle Shell: Antique Linen, Tea Dye, Vintage Photo and Walnut Stain
- Turtle Body and Shell Spots: Wild Honey, Peeled Paint and Worn Lipstick
- Birdy: Broken China and Worn Lipstick
- Grass and Sky: very light washes of Peeled Paint and Broken China
- Shading: Dark Green (PC#908), Dark Umber (PC#947), Copenhagen Blue (PC#906) and Sunburst Yellow (PC#917)
After all my watercoloring was finished, I went to work on the sentiment. With some selective stamping and handwriting, I created the “you are turtally awesome” sentiment in the upper right corner. The reason I chose to add in some of my own handwriting was because I wanted the word “turtally” to be larger than the rest of the sentiment… It is really fun when you incorporate your own handwriting into your cards; it adds a neat feel and you can create some great custom sentiments this way.

Once all my patterned papers were adhered, I cut a 4″x4″ piece of watercolor paper and stamped the sentiment using selective stamping from both the “Turtle” and “Cupcake Birdy” sets (both from Inky Antics). I also stamped the bird and grass as well, and watercolored them in with the same distress inks and pencils as for the bird on the front of the card. The sentiment panel was then adhered directly to the inside of the card with regular adhesive.
Finally, some finishing touches on the inside included faux stitching on the patterned paper and the sentiment panel, as well as some blue and white Baker’s Twine wrapped a couple of times around the front of the card.
I hope you enjoyed today’s Workshop Wednesday post and that it has inspired you to expand your creativity to the insides of your cards as well! Happy Creating! :)
Supplies
- Ranger Inkssentials Watercolor paper
- Inky Antics “Turtle” and “Cupcake Birdy” stamp sets
- Tim Holtz distress inks: Antique Linen, Tea Dye, Vintage Photo, Walnut Stain, Wild Honey, Peeled Paint, Worn Lipstick and Broken China
- Prismacolor Soft Core pencils: Dark Green (PC#908), Dark Umber (PC#947), Copenhagen Blue (PC#906) and Sunburst Yellow (PC#917)
- Recollections Home Basics 6×6 paper pack
- Authentique “Renew” 6×6 paper pack
- Copic Black 0.3 multiliner pen
- Uniball Signo white gel pen
- StazOn Jet Black ink
- blue and white baker’s twine
- Fiskars scalloped paper edgers
- Ranger Inkssentials ink blending tool


 LinkDeli Free 15 day trial
Loving it!