Thanks and Love

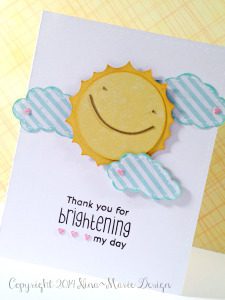
Taking a break from the Christmas cards, today I’m here to share with you a card that is perfect for all those “thank you” cards you’ll need once the holidays are over. :)
Today’s card features a sun image from Paper Smooches digi stamps collection, which I transformed into a Silhouette cut file so that I could paper piece the scene together. This is very simple and easy to do, so let’s get started and I’ll show you how I did it!
You’ll first need to download the sun digi stamp from the Paper Smooches website; this digi stamp is free by the way. Once you have downloaded the design, open the image up in your Silhouette Studio. You are going to want to trace this image, so… navigating to your trace tool, select the sun and set the tracing parameters as follows:
- Deselect the “high pass” filter; you want to make sure this setting turned off.
- Make sure the threshold is set at 45%; this is the default setting, and works perfectly for this image.
- Lastly, set the scale down to 4; this is the lowest scale setting, and we want to make sure we end up with a clean trace.
- Hit the “trace” option in the trace method settings.

To continue building my scene for my card, I then brought in some clouds, and a heart (which I duplicated to have three sets of three hearts) and I also created my sentiments using the fonts “BonvenoCF” and “DK Lampion“. There are two sentiments for this card; the “thank you” sentiment for the front, and the “I love you” sentiment for the inside.
Another little tip: for building purposes, I created an 4 1/4″ x 5 1/2″ rectangle to mimic the shape of an A2 card base. You of course do not have to do this, but it does help in designing your card to-scale on your computer.

I love how the sun takes center stage on this simple and cheery card… and the itty bitty hearts are so adorable!

Hope you all enjoyed this little thank you card post in the midst of all your Christmas preparations! See you again very soon! :)
Supplies
- Silhouette Cameo cutting mat, ratchet blade and pen holder
- Paper Smooches “sun” digi stamp
- Clouds and heart from the “Kite” cut file by Silhouette
- Recollections White Cardstock Paper
- Recollections Kraft Cardstock Paper
- Authentique “Renew” 8×8 paper pad
- American Crafts “With Love” 6×6 paper pad (discontinued)
- Uni-Ball Signo Gel Pen -White
- Copic Black Multiliner pen 0.3mm
- clear glitter glue


 LinkDeli Free 15 day trial