Sunday Spotlight: Paper Pieced Backgrounds
While working on yesterday’s cards focusing on getting the most out of your leftover die cuts, I thought it might be fun to share another neat way to use your die cuts… this time in the form of an intricately pieced background.
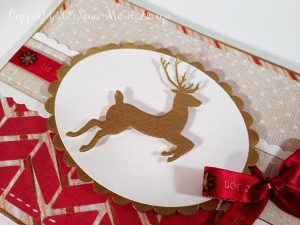
For this particular card, I focused on a lot of elegance. The silhouetted reindeer prancing in the air seemed to require a lot more sophistication, as befitting of Christmas, where rich reds and golds are always part of the holiday decor.
It is the background of this card though on which I am going to be concentrating on in today’s tutorial. With a few steps inside my Silhouette Studio, I quickly created a background that seems complex, but in reality is quite simple!
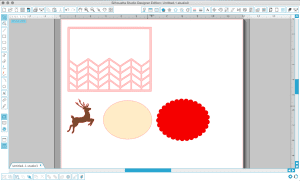
 To begin, you’ll want to have four files open in your Silhouette drawing area:
- an oval measuring 2.5″ x 3.14″
- a scalloped oval measuring 3.5″ x 2.8″
- the reindeer silhouette measuring 1.7″ x 2.3″
- the chevron background measuring 4.25″ x 5.5″
Once all your pieces are in your drawing area, cut the reindeer and both ovals out of white cardstock; set these aside. Before cutting the chevron border, you’ll first need to select three sheets of coordinating patterned paper. One will be the “frame” of your background and the other two will be the papers inside the frame. Go ahead and cut out the chevron background using the sheet of patterned paper you will want as your “frame”.
Papers I chose:
- for the frame: a striped pattern
- for the bottom portion: a solid red
- for the upper portion: a cream and white polka dot pattern
Now, before we move on to cutting the other two patterned papers, I am going to show you a step that will save your blade some wear and tear, and yourself some paper! While you do not have to do this step to complete the card, it is a handy technique that will prevent paper from being unnecessarily cut out. If you would like to skip this next step, simply go ahead and cut the chevron background out twice more from your other two patterned papers.
- Duplicate the chevron background; you should now have two in your drawing area.
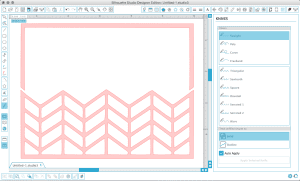
- For the first chevron background: with your straight edge knife tool set to “solid”, cut a diagonal line along the outer frame areas where the open space and the chevrons meet. This will end up creating two shapes, allowing all the chevrons to be perfectly cut and paper pieced into the bottom portion of your chevron background “frame”. Delete the upper portion.
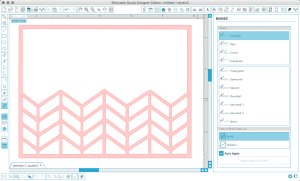
- For the second chevron background: using your straight edge knife once again (set to solid), detach the large open space area from the chevrons below. These cuts we are making into the file do not have to be perfect. We are only going to be using the inner portion of the large open space, which will be paper pieced into the frame we already cut out. You should now again have two shapes. This time, delete the bottom portion.
Now that we have both of our background pieces ready, you can cut them out of the other two patterned papers and being putting it all together! :)
To build your background, you want to have a piece of cardstock to be your base layer; any cardstock can be used for this, as it will eventually be completely covered. This paper piecing works best if you apply all your adhesive to the cardstock, and simply lay all the background pieces on top; kind of like building a puzzle.
- Adhere your “frame” to the cardstock
- Place in the upper portion into the frame
- Fit all the bottom portion pieces into the frame
A little tip: I kept all the pieces for the bottom portion on my cutting mat, so that they stayed in the proper order, and simply peeled them off the mat as I went along.
For the rest of the card, I covered the scalloped oval, the reindeer and the card base all with Versamark ink, and heat embossed them in gold embossing powder. I layered some patterned paper strips behind the reindeer, and tied a red ribbon around the middle. Some faux stitching details were also added to the card to finish it off.
The background seemed a bit busy to me at first while I was putting the pieces together, but the simplicity of the rest of the card’s features balances out the complex background nicely, and I love how the gold and red match up together.
I hope you enjoyed today’s tutorial! Stop back again soon, as I have a neat card to feature, which focuses on using small stamps to create a larger image!
Happy Creating!
Supplies
- Silhouette Cameo, cutting mat and ratchet blade
- Reindeer Silhouettes cut file by Deborah Stine
- Nesting Scalloped Ovals cut file by Samantha Walker
- Recollections White cardstock
- DCVW “Christmas Made” 12×12 paper pad
- Versamark ink pad
- Ranger Super Fine Gold embossing powder
- Uniball Signo white gel pen
- Fiskars scalloped paper edgers
- ribbon
Note: the Chevron Background digital cut file by Two Peas in a Bucket is no longer available on their website as they have closed. However, you can find the file on my Pinterest page, or download it here: [download id=”1028″]


 LinkDeli Free 15 day trial