Creating Fun Shaped Cards
Happy Saturday Everybody!

Today’s cards use two beautiful cut files made by Miss Kate Cuttables, and are available on the Silhouette Design Store. And head’s up… Silhouette’s Design Store is holding a special sale until December 8th, with 50% off all designs! Now’s a great time to stock up on some designs to use in your holiday projects!
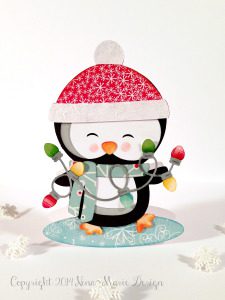
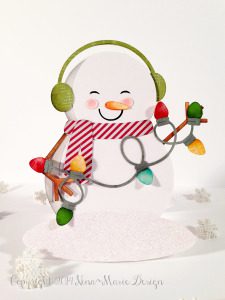
The creating of these cards is very simple; don’t let the fact that it’s “shaped” discourage you! I paper pieced both the penguin and snowman from a variety of patterned and textured papers and added a few special details to make them stand out.
For the penguin, I colored his cheeks, beak and feet with distress inks and a water brush. I also inked around the edges of the oval base the penguin is standing on in Broken China distress ink to make it appear as an ice rink. Finishing touches included distress stickles on the white areas of his hat, and Glossy Accents coating all the lightbulbs on the string of lights he is holding… he’s absolutely adorable! :)

Some tips in creating shaped cards:
- I added distress ink to the edges of all the papers, so that no white edges were showing… this is a great technique to use when making cards that you don’t want the edges of the paper to distract from your design. You could also use a medium or broad tipped marker and trace around the edges.
- Use a heavy weight cardstock for the base layer of the card; this helps hold your shaped card up as you add more and more layers of paper piecing and embellishments.
- When creating a shaped card, make sure you duplicate both the front or back base layers to the exact dimensions as the other. And unless you are altering the design in any way, make sure all your pieces are sized to the same scale… otherwise your penguin’s cozy hat won’t fit on his poor head! :)
- For the majority of shaped cards, a top folding card work best.
While today’s cards continue with the holiday theme, they could easily be used for general winter cards as well with a few minor changes… For example, both would make adorable Valentine’s Day cards by replacing the string of lights with a heart… they could also be holding a banner with a sentiment, or wear a party hat for a birthday card… the possibilities are endless!
I hope today’s post has inspired you to think outside the rectangle of your card and create a beautiful and fun shaped card with those dies, cut files or stamps in your supply stash!
Leave a comment with a link to your blog (or online photo sharing profile) to share a shaped card that you have created!
Supplies
Penguin card:
- Penguin with lights cut file by Miss Kate Cuttables (available on the Silhouette Design Store)
- Silhouette Cameo cutting mat and ratchet blade
- Card base: Simon Says Stamp 120lb White Cardstock
- Hat: DoCrafts “12 Days of Christmas” 6×6 paper pack
- Penguin body: Doodlebug “Rainbow Assortment” Textured Solid Core Cardstock
- Penguin shadows and light string: Recollection’s Neutral Cardstock Paper
- Penguin face & belly: Recollection’s White Cardstock Paper
- Oval base: My Mind’s Eye “Merry Little Christmas” 6×6 paper pad (discontinued; good replacement would be the snowflakes sheet in the Pebbles “Home for Christmas 6×6 paper pad)
- Scarf: Colorbök Sweet Home 12×12 paper pack (discontinued; good replacement would be the multicolored stripes in the Kaiser Mistletoe 6.5 x 6.5 Paper Pad)
- Tim Holtz distress inks: Worn Lipstick, Iced Spruce, Broken China, Festive Berries, Black Soot, Mowed Lawn, Wild Honey, Rusty Hinge, Spiced Marmalade
- Ranger Ink Blending tool
- Tim Holtz Detailer Waterbrush
- Rock Candy Distress Stickles
- Glossy Accents
- random red, green, blue and yellow paper scraps for the lightbulbs
Snowman card:
- Snowman with lights cut file by Miss Kate Cuttables (available on the Silhouette Design Store)
- Silhouette Cameo cutting mat and ratchet blade
- Card base: Simon Says Stamp 120lb White Cardstock
- Snowman shadows and light string: Recollection’s Neutral Cardstock Paper
- Snowman body and oval base: Recollection’s White Cardstock Paper
- Scarf and hat: Pink Paislee “Merry & Bright” 6×6 paper pack
- Tim Holtz distress inks: Worn Lipstick, Iced Spruce, Broken China, Festive Berries, Mowed Lawn, Wild Honey, Rusty Hinge, Spiced Marmalade, Vintage Photo, Walnut Stain
- Recollections Signature Extra Fine Glitter
- Tim Holtz Detailer Waterbrush
- Ranger Ink Blending tool
- Glossy Accents
- random red, green, blue and yellow paper scraps for the lightbulbs


 LinkDeli Free 15 day trial
These shaped cards are so cute and full of fun. Great job!
stunning cards!!! Thanks so much for joining us at the Simon Says Stamp Monday Challenge Blog! Happy Holidays :) – Ashli