Celebrate
Hello Everyone! So glad you’ve stopped by today!
Celebration cards are so versatile and can be used for a variety of events, such as birthday, new baby, anniversary, graduation, big achievement, weddings, etc. Today’s card features a lot of die cutting using both the Silhouette Cameo and the Sizzix Big Shot, but could be easily replicated with just one of these die cutting machines.

The layout for this card was inspired by the Freshly Made Sketches challenge #173; the balloons hold the left panel, and I used the little box as my sentiment placeholder, moving it down to the bottom of the card.
I began by die cutting all my balloons first, using some patterned and glittered papers from the Craft Smith’s “Blackberry Lemon” paper pad, and three balloons from the Simon Says Stamp’s “Celebration Time” wafer die set. Once all my balloons were run through the Big Shot machine, I inked the edges of all of them with coordinating inks, to help finish them off. On the balloons that were made from the non-glittered pattern paper, I covered them with Wink of Stella clear glitter, which helps tie in with the rest of the balloons.

Next, using my Silhouette Cameo, I die cut the “celebrate” sentiment from some yellow cardstock. The image used to create this die from a Scrapbook and Cards Today free digital file, available here. I simply traced the image with the tracing tool inside the Silhouette Studio software (designer edition), to convert it into a cut file. Once cut, I covered the sentiment with some clear Wink of Stella glitter.
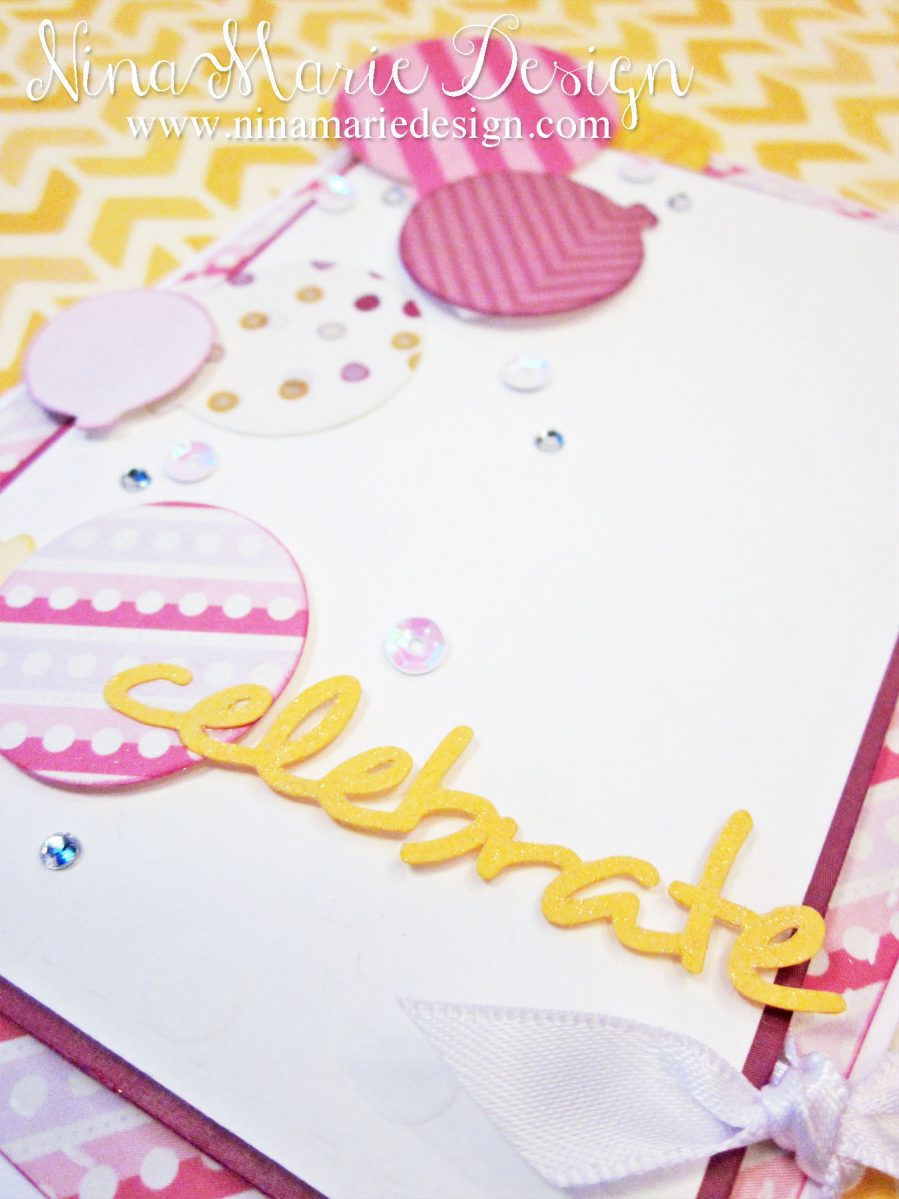
Now that all my elements were ready, I was ready to begin putting my card together. I cut an A2 sized, top folding card base from some 110b white cardstock, and covered it in some more patterned paper from the “Blackberry Lemon” collection.
I cut a white cardstock panel and using a Heidi Swapp polka dot stencil, I ran it through my Big Shot to emboss the pattern into it before layering it on top of some patterned paper.
Tip on embossing with a stencil…
This is very easy! Simply use the same embossing “sandwich” that you would use for a texture plate. In the case of the Big Shot, use tab #1, followed by a clear plate (cutting pad), your rubber embossing mat, your paper, the stencil, and lastly, the embossing plate.
So moving on with the card…
I adhered my embossed panel onto my card base with foam tape, and then layered all my balloons along the left side of the card using both foam tape and regular adhesive, to create the illusion of depth.

My sentiment is attached to the bottom portion of the card with foam tape. I also scattered some sequins and rhinestones around the balloons, and added faux stitching around the edges of the card. Finally, I tied a white satin ribbon around the bottom portion of the card to finish it all off.
I just love how festive this card is, with all the sparkle and shimmer… I hope you’ve enjoyed!
Happy Creating!
Inspiration & Challenges
This card’s layout is inspired by the Freshly Made Sketches challenge #173. It is also submitted into the challenge.
The colors used in this card are inspired by the “Cure for the Monday Blues” challenge #43, and is also submitted into the challenge.
This card is also submitted into the Simon Says Stamp Flickr challenge #12 “So Sparkly”.
[one_third]![]() [/one_third][one_third]
[/one_third][one_third] [/one_third][one_third_last]
 [/one_third_last]

 LinkDeli Free 15 day trial
Love those pops of colour and the fun layering! Thanks so much for playing to find a Cure For The Monday Blues!
This is wonderful! Fun mix of pattern, color,and texture! Glad you joined us at FMS!
LOVE! This is so fun!
Oh wow! This is just fabulous! Love those fun balloons, sequins and bling! Such a great card! Thanks for joining us this week at Freshly Made Sketches!
Simply beautiful !!!!