Workshop Wednesday: Hello Baby!
 Hello once more!
I am thrilled you’ve continued along with me on today’s three-part Workshop Wednesday. If you’ve missed part one (It’s A Boy!) or part two (Its A Girl!), be sure to check them out as well!
Hello Baby!
 Today’s final baby card could be for a boy or girl… And I love how happy the colors are! For this card’s layout, I was inspired by the sketch from this week’s CAS(E) this Sketch challenge (#105).
Using the “baby” cut file, I cut the letters out of some white cardstock using my Silhouette Cameo. Once the letters were cut, I stamped the “hello” greeting by doing some selective masking and stamping with the Simon Says Stamp “Celebrate” stamp set. The ink I chose for the sentiment was StazOn Jet Black ink.
Next, I layered some polka dot patterned paper behind the panel using dimensional foam tape. Also layered behind this panel is some yellow paper and a white scalloped edge piece of cardstock. All of these pieces were then adhered to my card base using foam tape.
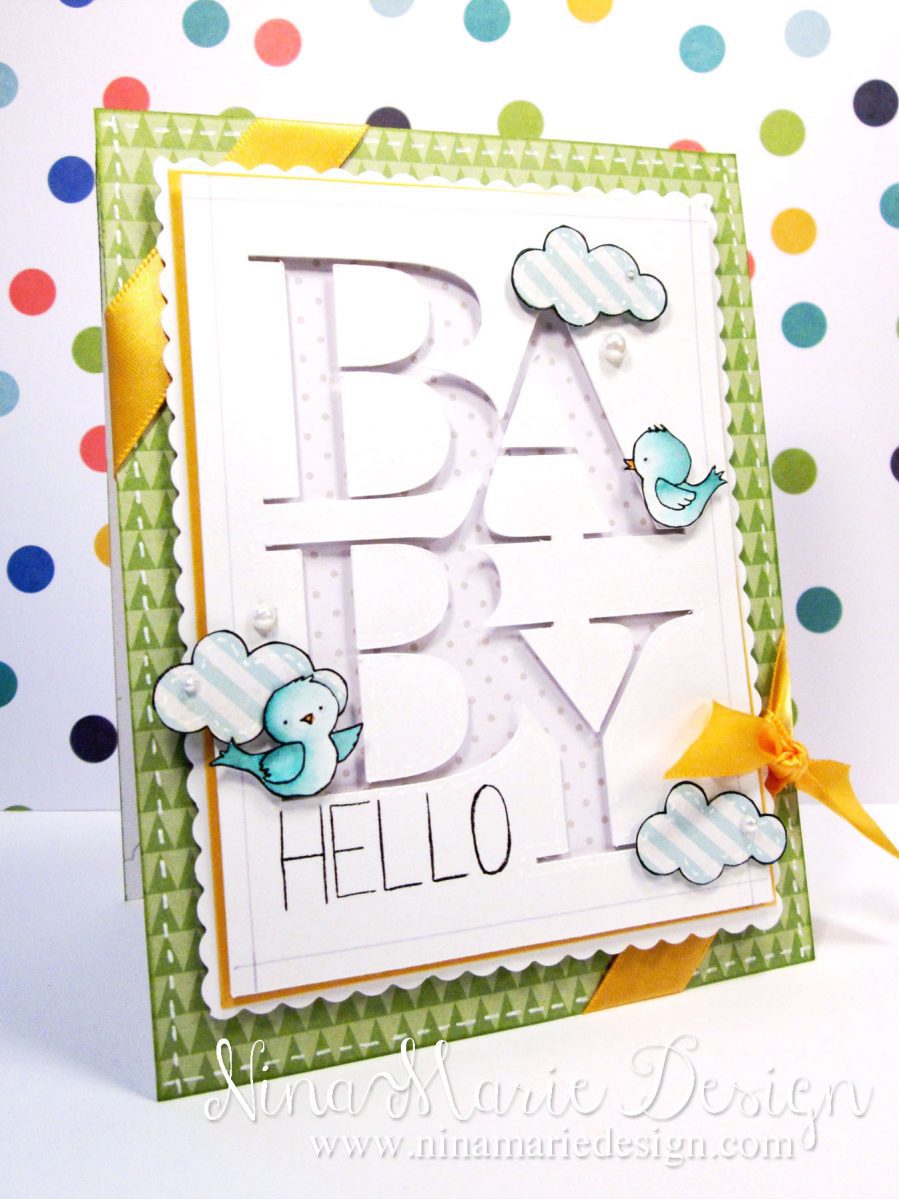 The adorable little birds sitting on the letters are from the Inky Antics “Turtle” stamp set and are stamped onto watercolor paper. I colored them with Peacock Feathers, Evergreen Bough, and Rusty Hinge distress inks before fussy cutting them out and adhering them to the card with foam tape.
I really thought this card needed some extra dressing up, so I stamped the clouds, from the “Soaring for You” stamp set by Simon Says Stamp, onto patterned paper with Jet Black ink; once cut out, they were then adhered to the card base along with some white pearls.
To finish off the front of this card, I added some Glossy Acents to the eyes of the birds, tied a yellow ribbon around the top left and bottom right corners, and added some faux stitching in places using a white gel pen.
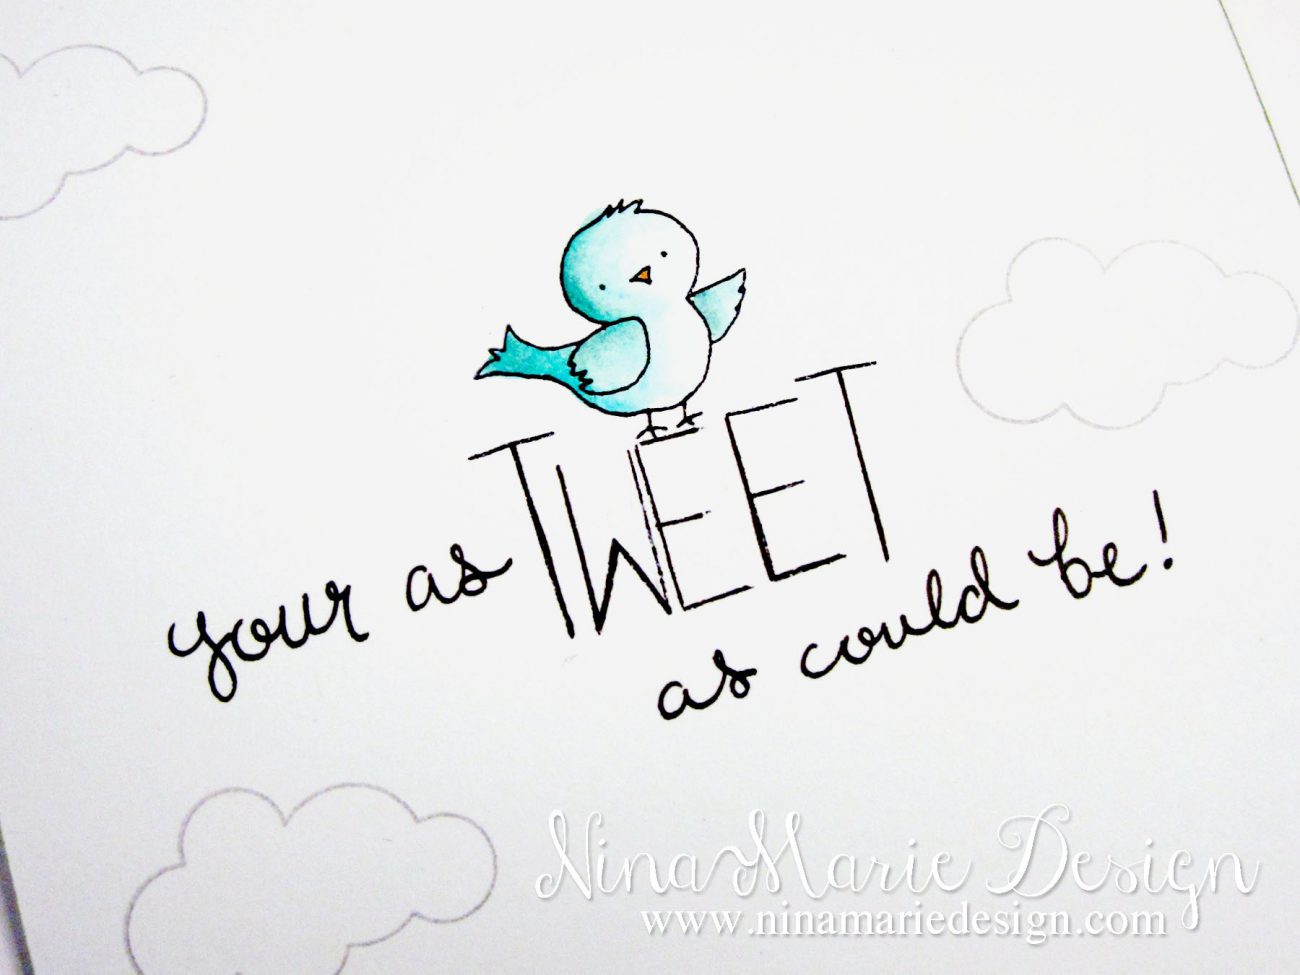 Next came the inside of this card… With the Simon Says Stamp “Celebrate” stamp set, I once again did some selective stamping and masking to create the word “tweet” (a play on “sweet”!). Using a Copic multi-liner, I hand wrote the rest of the sentiment for a fun and playful feel.
With the same bird stamp used on the front, I stamped and colored it exactly as I did for the front; the clouds are stamped in some gray pigment ink.
And that completes the third and final card for this week’s Wednesday Workshop! Whew, that was quite a workout, huh!? :) I hope you enjoyed the cards, and if you missed part one (“Its a Boy!”) and part two (“Its a Girl!”), definitely check them out!
Challenges
This card has been submitted to the CAS(E) this Sketch challenge #105 and the CASology week 129 “NBUS” (“Never Been Used Schtuff”) challenge. My “NBUS” product for this card was the green triangles and white/gray polka dot patterned papers, and the “baby” word cut file.
[one_third]![]() [/one_third][one_third]
[/one_third][one_third] [/one_third]

 LinkDeli Free 15 day trial
Popping back to thank you for also linking to my NBUS Challenge #3!! Hugs, Darnell
Your series is wonderful, Nina-Marie! This particular card should be used a room decoration in the baby’s room, it is so fantastic!! I’m sure it will be a treasured keepsake for the recipient, but it’s way too pretty to be put away in a drawer!!
Thank you so much for playing in the CASology challenge! This week CASology is collaborating with my NBUS Challenge #3 as you may have seen on the CASology site, so if you’ve linked a NBUS creation with CASology, please feel free to also link over at my challenge! Have a great day! Hugs, Darnell (djkardkreations.com)
So sweet, with fabulous dimension!
Thanks so much for playing at CAS(E) this sketch!
Such an adorable card, and lots of juicy NBUS on display. Thanks so much for joining in on the fun this week at CASology.
Fun baby card, love those little birdies! Thank you for sharing with us this week at CASology!