Thank You Tulips
 Hello Everyone!
Hope you all are saying warm on this very chilly day here in the Northeast… and for those of you who are in a warmer climate: enjoy it! :)
 It is always good to branch out a little in the shape of one’s card; most cards are sized in A2 measurements, and while that is a great size for most cards (and easy to mail!), I like to once in a while get a little more adventurous on my designs! So today I have a interesting tutorial to share with you on creating your own fun shaped cards. Let’s get started!
I designed a card base inside my Silhouette Studio by creating a 5 1/4″ x 8 1/2″ rectangle and welded a flourished edge to the top and bottom of the rectangle, which brought my height to 7″ total; this is the card base. Creating another rectangle, sized at 3″ by 8 1/4″, I added the same flourished edge to the bottom only of this rectangle. This panel will be adhered to the inside of the card.

Once I had the pieces built, I cut them out onto watercolor paper and scored the card base at 3 1/2″. Taking the Technique Tuesday “Budding Poppies” and the Simon Says Stamp “Summer Garden” stamp sets, I stamped all my images in Versamark ink and heat embossed with white embossing powder onto my card base and the inside panel. I also heat embossed all the poppies four times onto a separate piece of watercolor paper.
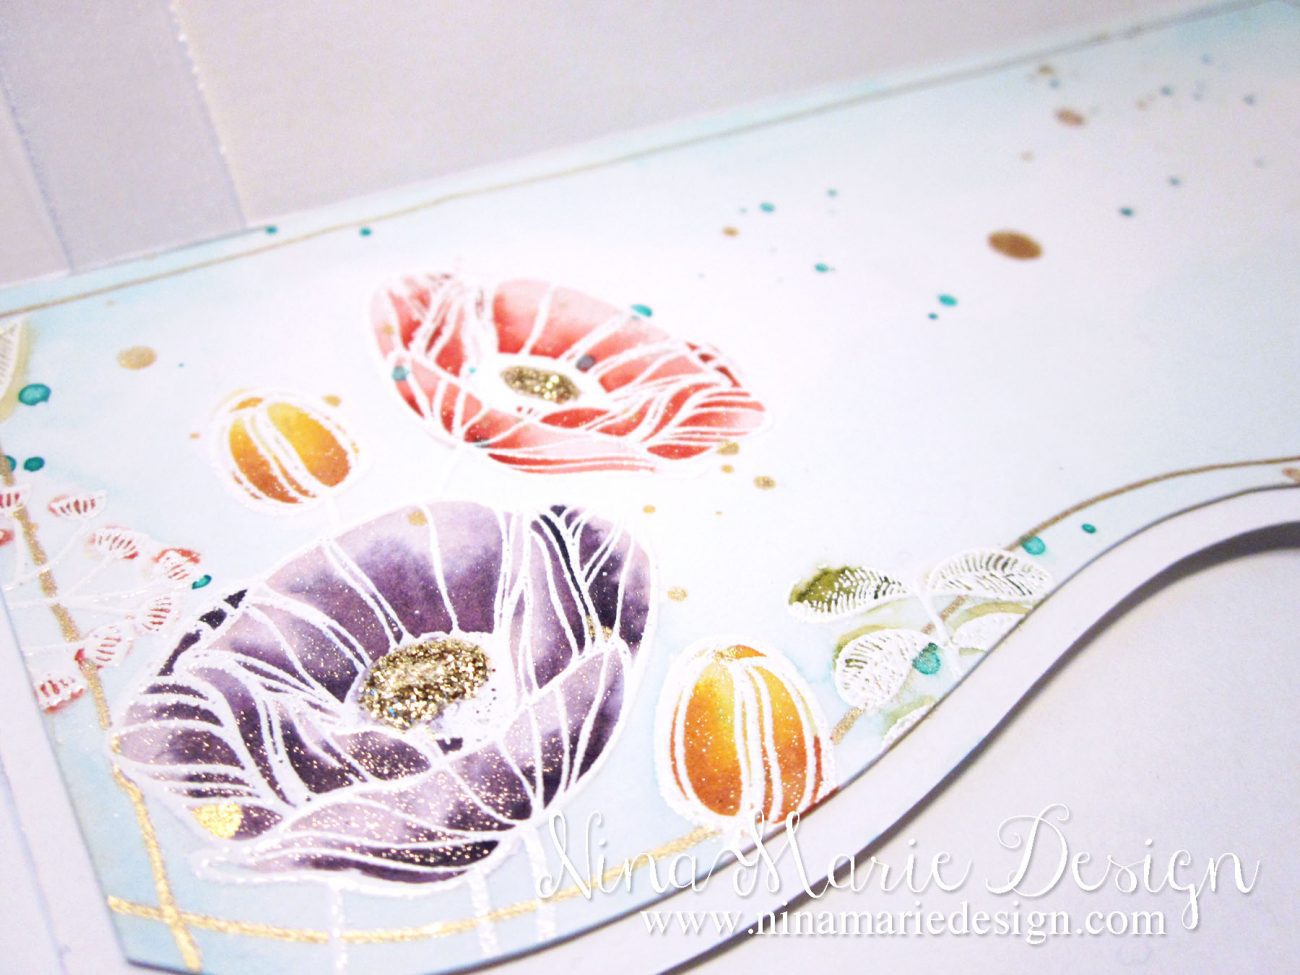 While this flower stamp I used is actually a poppy, it reminded me of a tulip and I turned it into one! :) Using some Tim Holtz distress inks, I began watercoloring all the flowers and leaves on both my card base and panel; I also watercolored all the poppies that I had stamped onto the other piece of watercolor paper. Once all the flowers were colored, I began watercoloring the background of the card base and panel.
After all the watercolring was complete, I stamped a lattice pattern in the background, and applied ink splatters around the card and inside panel.
Taking a gold gel pen, I drew a freehand border around the edges of the card and panel to frame the images. I allowed the lines to overlap, which I think makes the “hand drawn” effect look more interesting.
 Cutting a banner out of a piece of cardstock, I stamped the word “Thank You” and embossed it in Ranger’s Princess Gold embossing powder and drew a gold border around the edges, before adhering the banner to the card base. I also tied a sheer ribbon around the left side of the card.
After fussy cutting the flowers that were stamped and watercolored on the separate piece of watercolor paper, I adhered them overtop of the poppies that were on the card base using dimensional tape. With some gold glitter glue, I added the shiny centers and covered all the flower petals and leaves with Wink of Stella clear glitter.
Finally, I adhered the inner panel to the inside of my card, and applied the same embellishing touches as I did to the front on the flowers and leaves.
 I love the delicate feel this card gets with embossing of all the poppies and leaves in white. The lines blend into the card nicely, allowing the contrast of the color to really pop.
Thanks for stopping by today! :)
Challenges
This card is submitted to the Simon Says Stamp Wednesday Challenge “Something New” and the Simon Says Stamp Monday Challenge “Old & New”.
Supplies
- Ranger Inkssentials watercolor paper
- Recollections White Cardstock
- Silhouette Cameo, cutting mat and ratchet blade
- Technique Tuesday “Budding Poppies” stamp set
- Simon Says Stamp “Summer Garden” stamp set
- Tim Holtz distress inks: Worn Lipstick, Festive Berries, Tea Dye, Wild Honey, Dusty Concord, Milled Lavender, Peacock Feathers, Peeled Paint
- Ranger Princess Gold embossing powder
- Recollections White embossing powder
- Versamark ink pad
- gold gel pen
- Heidi Swapp color shine: Gold Lame, Mint
- Wink of Stella clear glitter
- sheer ribbon
- gold glitter glue

 LinkDeli Free 15 day trial
wow, gorgeous! .so glad you played along with Simon Says Stamp Wednesday Challenge!
add a little glimmer to your life….sparkle & shine! *~*
Such a gorgeous card. The flowers and sentiment are fabulous. Thank you so much for sharing with us at Simon Says Stamp Monday Challenge. :)
A gorgeous card Nina, a fabulous design and beautiful colouring of the stunning flowers!!
Thanks so much for joining us at Simon Says Stamp Wednesday Challenge
hugs
Heather xx
Wow, this is gorgeous!
Wow, I’m blow away! Just discovered your project while browsing through the entries at the current SSS Something New challenge and your card caught my eye right away. Your coloring is amazing, I love how you fade out the color to the tips of the flowers. And that sprinkled background – yummy! This card is an awesome inspiration, thank you so much for sharing it!
Thanks Julia, I am glad you enjoyed it! :)